Datadog
Datadog is a cloud-scale application observability solution that monitors servers, databases, tools, and services. Nobl9 connects with Datadog to collect SLI measurements and compare them to SLO targets. Nobl9 can activate processes and notifications when the error burn rate is too high or has been surpassed because it calculates error budgets of acceptable thresholds.
Users can pass business context through monitoring data, developing and measuring reliability targets, and aligning activities against the error budget's priorities using the Datadog Nobl9 integration.
Authentication
When deploying the Nobl9 agent, user needs to provide an API Key and Application Key with DD_API_KEY and DD_APPLICATION_KEY environment variables. Alternatively, credentials can be passed as using a local config file with keys api_key and application_key under n9datadog (or n9datadog_v2) section.
The procedure to obtain both keys is documented in the API and Application Keys | Datadog documentation.
To connect to Datadog, the Nobl9 agent scrapes the /api/v1/query endpoint that requires timeseries_query authorization scope. Make sure your account has this scope before you connect to Datadog.
For more details, refer to Datadog documentation.
Adding Datadog as a data source
To ensure data transmission between Nobl9 and your data source, it may be necessary to list Nobl9 IP addresses as trusted.
- 18.159.114.21
- 18.158.132.186
- 3.64.154.26
You can add the Datadog data source using the direct or agent connection methods. For both methods, start with these steps:
- Navigate to Integrations > Sources.
- Click
 .
. - Click the relevant Source icon.
- Choose a relevant connection method (Agent or Direct), then configure the source as described below.
Datadog direct
Direct configuration in the UI
Direct configuration for Datadog requires users to enter their credentials which Nobl9 stores safely. To set up this type of connection:
-
Select one of the following Release Channels:
- The
stablechannel is fully tested by the Nobl9 team. It represents the final product; however, this channel does not contain all the new features of abetarelease. Use it to avoid crashes and other limitations. - The
betachannel is under active development. Here, you can check out new features and improvements without the risk of affecting any viable SLOs. Remember that features in this channel may be subject to change.
- The
-
Enter the Datadog API endpoint to connect to your data source.
It is a Datadog SaaS instance that corresponds to one of Datadog's available locations:datadoghq.com(formerly referred to asCOM),us3.datadoghq.comus5.datadoghq.comdatadoghq.eu(formerly referred to asEU),ddog-gov.com,ap1.datadoghq.com
-
Enter the API Key.
-
Enter the Application Key.
- Select a Project.
Specifying a project is helpful when multiple users are spread across multiple teams or projects. When the Project field is left blank, Nobl9 uses thedefaultproject. - Enter a Display Name.
You can enter a user-friendly name with spaces in this field. - Enter a Name.
The name is mandatory and can only contain lowercase, alphanumeric characters, and dashes (for example,my-project-1). Nobl9 duplicates the display name here, transforming it into the supported format, but you can edit the result. - Enter a Description.
Here you can add details such as who is responsible for the integration (team/owner) and the purpose of creating it. - Specify the Query delay to set a customized delay for queries when pulling the data from the data source.
- The default value in Datadog integration for Query delay is
1 minute.
infoChanging the Query delay may affect your SLI data. For more details, check the Query delay documentation. - The default value in Datadog integration for Query delay is
- Enter a Maximum Period for Historical Data Retrieval.
- This value defines how far back in the past your data will be retrieved.
- The value for the maximum period of data retrieval depends on the data source. Check the Replay documentation for details.
- A greater period can extend the loading time when creating an SLO.
- The value must be a positive integer.
- Enter a Default Period for Historical Data Retrieval.
- It is used by SLOs connected to this data source.
- The value must be a positive integer or
0. - By default, this value is set to 0. When you set it to
>0, you will create SLOs with Replay.
- Click Add Data Source
Direct using CLI - YAML
The YAML for setting up a direct connection to Datadog looks like this:
apiVersion: n9/v1alpha
kind: Direct
metadata:
  name: datadog-direct
  displayName: Datadog direct
  project: datadog-direct
spec:
  description: direct integration with Datadog
  sourceOf:
    - Metrics
    - Services
  queryDelay:
      unit: Minute
      value: 720
  logCollectionEnabled: false
  datadog:
    site: us5.datadoghq.com
    apiKey: ""
    applicationKey: "" # secret
  historicalDataRetrieval:
    maxDuration:
      value: 30
      unit: Day
    defaultDuration:
      value: 7
      unit: Day
| Field | Type | Description |
|---|---|---|
queryDelay.unitmandatory | enum | Specifies the unit for the query delay. Possible values: Second | Minute. • Check query delay documentation for default unit of query delay for each source. |
queryDelay.value mandatory | numeric | Specifies the value for the query delay. • Must be a number less than 1440 minutes (24 hours). • Check query delay documentation for default unit of query delay for each source. |
logCollectionEnabledoptional | boolean | Optional. Defaults to false. Set to true if you'd like your direct to collect event logs. Beta functionality available only through direct release channel. Reach out to support@nobl9.com to activate it. |
releaseChannelmandatory | enum | Specifies the release channel. Accepted values: beta | stable. |
| Source-specific fields | ||
datadog.sitemandatory | string | Datadog SaaS instance that corresponds to one of Datadog's available locations: • datadoghq.com (formerly referred to as `COM`)• us3.datadoghq.com • us5.datadoghq.com• datadoghq.eu (formerly referred to as `EU`)• ddog-gov.com• ap1.datadoghq.com |
datadog.apiKeymandatory | string, secret | See authentication section above for more details. |
datadog.applicationKeymandatory | string, secret | See authentication section above for more details. |
| Replay-related fields | ||
historicalDataRetrievaloptional | n/a | Optional structure related to configuration related to Replay. ❗ Use only with supported sources. • If omitted, Nobl9 uses the default values of value: 0 and unit: Day for maxDuration and defaultDuration. |
maxDuration.valueoptional | numeric | Specifies the maximum duration for historical data retrieval. Must be integer ≥ 0. See Replay documentation for values of max duration per data source. |
maxDuration.unitoptional | enum | Specifies the unit for the maximum duration of historical data retrieval. Accepted values: Minute | Hour | Day. |
defaultDuration.valueoptional | numeric | Specifies the default duration for historical data retrieval. Must be integer ≥ 0 and ≤ maxDuration. |
defaultDuration.unitoptional | enum | Specifies the unit for the default duration of historical data retrieval. Accepted values: Minute | Hour | Day. |
Datadog agent
Agent configuration in the UI
Follow the instructions below to create your DataDog Agent configuration. Refer to the section above for the description of the fields.
-
Select one of the following Release Channels:
- The
stablechannel is fully tested by the Nobl9 team. It represents the final product; however, this channel does not contain all the new features of abetarelease. Use it to avoid crashes and other limitations. - The
betachannel is under active development. Here, you can check out new features and improvements without the risk of affecting any viable SLOs. Remember that features in this channel may be subject to change.
- The
-
Enter the Datadog API endpoint to connect to your data source.
- Enter a Project.
- Enter a Name.
- Create a Description.
- In the Advanced Settings you can:
- Enter a Maximum Period for Historical Data Retrieval.
- Enter a Default Period for Historical Data Retrieval.
- Click Add Data Source
Agent using CLI - YAML
The YAML for setting up an Agent connection to Datadog looks like this:
apiVersion: n9/v1alpha
kind: Agent
metadata:
  name: datadog
  project: datadog
spec:
  datadog:
    site: datadoghq.com
  sourceOf:
    - Metrics
    - Services
  releaseChannel: beta
  queryDelay:
      unit: Minute
      value: 720
  historicalDataRetrieval:
      maxDuration:
        value: 30
        unit: Day
      defaultDuration:
        value: 0
        unit: Day
| Field | Type | Description |
|---|---|---|
queryDelay.unitmandatory | enum | Specifies the unit for the query delay. Possible values: Second | Minute. • Check query delay documentation for default unit of query delay for each source. |
queryDelay.value mandatory | numeric | Specifies the value for the query delay. • Must be a number less than 1440 minutes (24 hours). • Check query delay documentation for default unit of query delay for each source. |
releaseChannelmandatory | enum | Specifies the release channel. Accepted values: beta | stable. |
| Source-specific fields | ||
datadog.sitemandatory | string | Datadog SaaS instance that corresponds to one of Datadog's available locations: • datadoghq.com (formerly referred to as `COM`)• us3.datadoghq.com • us5.datadoghq.com• datadoghq.eu (formerly referred to as `EU`)• ddog-gov.com• ap1.datadoghq.com |
| Replay-related fields | ||
historicalDataRetrievaloptional | n/a | Optional structure related to configuration related to Replay. ❗ Use only with supported sources. • If omitted, Nobl9 uses the default values of value: 0 and unit: Day for maxDuration and defaultDuration. |
maxDuration.valueoptional | numeric | Specifies the maximum duration for historical data retrieval. Must be integer ≥ 0. See Replay documentation for values of max duration per data source. |
maxDuration.unitoptional | enum | Specifies the unit for the maximum duration of historical data retrieval. Accepted values: Minute | Hour | Day. |
defaultDuration.valueoptional | numeric | Specifies the default duration for historical data retrieval. Must be integer ≥ 0 and ≤ maxDuration. |
defaultDuration.unitoptional | enum | Specifies the unit for the default duration of historical data retrieval. Accepted values: Minute | Hour | Day. |
You can deploy only one Agent in one YAML file by using the sloctl apply command.
Deploying Datadog agent
When you add the data source, Nobl9 automatically generates a Kubernetes configuration and a Docker command line for you to use to deploy the Agent. Both of these are available in the web UI, under the Agent Configuration section. Be sure to swap in your credentials (e.g., replace the <DATADOG_API_KEY> and <DATADOG_APPLICATION_KEY> with your organization keys).
- Kubernetes
- Docker
If you use Kubernetes, you can apply the supplied YAML config file to a Kubernetes cluster to deploy the agent. It will look something like this:
# DISCLAIMER: This deployment description contains only the fields necessary for the purpose of this demo.
# It is not a ready-to-apply k8s deployment description, and the client_id and client_secret are only exemplary values.

apiVersion: v1
kind: Secret
metadata:
  name: nobl9-agent-nobl9-dev-datadog-month-g
  namespace: default
type: Opaque
stringData:
  datadog_api_key: "<DATADOG_API_KEY>"
  datadog_application_key: "<DATADOG_APPLICATION_KEY>"
  client_id: "unique_client_id"
  client_secret: "unique_client_secret"
---
apiVersion: apps/v1
kind: Deployment
metadata:
  name: nobl9-agent-nobl9-dev-datadog-month-datadogagent
  namespace: default
spec:
  replicas: 1
  selector:
    matchLabels:
      nobl9-agent-name: "datadogagent"
      nobl9-agent-project: "datadog-month"
      nobl9-agent-organization: "nobl9-dev"
  template:
    metadata:
      labels:
        nobl9-agent-name: "datadogagent"
        nobl9-agent-project: "datadog-month"
        nobl9-agent-organization: "nobl9-dev"
    spec:
      containers:
        - name: agent-container
          image: nobl9/agent:0.73.2
          resources:
            requests:
              memory: "350Mi"
              cpu: "0.1"
          env:
            - name: N9_CLIENT_ID
              valueFrom:
                secretKeyRef:
                  key: client_id
                  name: nobl9-agent-nobl9-dev-datadog-month-datadogagent
            - name: N9_CLIENT_SECRET
              valueFrom:
                secretKeyRef:
                  key: client_secret
                  name: nobl9-agent-nobl9-dev-datadog-month-datadogagent
            - name: DD_API_KEY
              valueFrom:
                secretKeyRef:
                  key: datadog_api_key
                  name: nobl9-agent-nobl9-dev-datadog-month-datadogagent
            - name: DD_APPLICATION_KEY
              valueFrom:
                secretKeyRef:
                  key: datadog_application_key
                  name: nobl9-agent-nobl9-dev-datadog-month-datadogagent
            # The N9_METRICS_PORT is a variable specifying the port to which the /metrics and /health endpoints are exposed.
            # The 9090 is the default value and can be changed.
            # If you don’t want the metrics to be exposed, comment out or delete the N9_METRICS_PORT variable.
            - name: N9_METRICS_PORT
              value: "9090"
If you use Docker, you can run the Docker command to deploy the agent. It will look something like this::
# DISCLAIMER: This Docker command contains only the fields necessary for the purpose of this demo.
# It is not a ready-to-apply command, and you will need to replace the placeholder values with your own values.

docker run -d --restart on-failure \
  --name nobl9-agent-nobl9-dev-datadog-month-test \
  -e N9_CLIENT_ID="unique_client_id" \
  -e N9_CLIENT_SECRET="unique_client_secret" \
  # The N9_METRICS_PORT is a variable specifying the port to which the /metrics and /health endpoints are exposed.
  # The 9090 is the default value and can be changed.
  # If you don’t want the metrics to be exposed, comment out or delete the N9_METRICS_PORT variable.
  -e N9_METRICS_PORT=9090 \
  -e DD_API_KEY="<DATADOG_API_KEY>" \
  -e DD_APPLICATION_KEY="<DATADOG_APPLICATION_KEY>" \
  nobl9/agent:0.73.2
Creating SLOs with Datadog
Creating SLOs in the UI
Follow the instructions below to create your SLOs with Datadog in the UI:
-
Navigate to Service Level Objectives.
-
Click.
-
In step 1 of the SLO wizard, select the Service the SLO will be associated with.
-
In step 2, select Datadog as the Data Source for your SLO, then specify the Metric. You can choose either a Threshold Metric, where a single time series is evaluated against a threshold, or a Ratio Metric, which allows you to enter two time series to compare (for example, a count of good requests and total requests).
- Choose the Data Count Method for your ratio metric:
- Non-incremental: counts incoming metric values one-by-one. So the resulting SLO graph is pike-shaped.
- Incremental: counts the incoming metric values incrementally, adding every next value to previous values.
It results in a constantly increasing SLO graph.
- Choose the Data Count Method for your ratio metric:
-
Enter a Query or Good Query and Total Query for the metric you selected. The following are query examples:
-
Threshold metric for Datadog:
Query:avg:trace.http.request.duration{service:my-service}.as_count() -
Ratio metric for Datadog:
Good query:avg:trace.http.request.hits.by_http_status{service:my-service,!http.status_class:5xx}.as_count()Total query:
avg:trace.http.request.hits.by_http_status{service:my-service}.as_count()SLI values for good and totalWhen choosing the query for the ratio SLI (countMetrics), keep in mind that the values resulting from that query for both good and total:- Must be positive.
- While we recommend using integers, fractions are also acceptable.
- If using fractions, we recommend them to be larger than
1e-4=0.0001. - Shouldn't be larger than
1e+20.
-
-
In step 3, define a Time Window for the SLO.
-
In step 4, specify the Error Budget Calculation Method and your Objective(s).
-
In step 5, add a Name, Description, and other details about your SLO. You can also select Alert policies and Labels on this screen.
-
When you’re done, click Create SLO.
SLOs using Datadog - YAML samples
- rawMetric
- countMetric
Here’s an example of Datadog using a rawMetric (threshold metric):
apiVersion: n9/v1alpha
kind: SLO
metadata:
  displayName: datadog-calendar-occurrences-threshold
  name: datadog-calendar-occurrences-threshold
  project: datadog
spec:
 budgetingMethod: Occurrences
 description: ""
 indicator:
   metricSource:
     name: datadog
 service: datadog-n9
 objectives:
 - target: 0.8
   op: lte
   rawMetric:
     query:
       datadog:
         query: avg:trace.http.request.duration{*}
   displayName: awesome
   value: 0.04
 - target: 0.99
   op: lte
   rawMetric:
     query:
       datadog:
         query: avg:trace.http.request.duration{*}
   displayName: so-so
   value: 0.1
  timeWindows:
    - calendar:
        startTime: "2020-11-14 12:30:00"
        timeZone: Etc/UTC
      count: 1
      isRolling: false
      unit: Day
Here’s an example of Datadog using a countMetric (ratio metric):
apiVersion: n9/v1alpha
kind: SLO
metadata:
  displayName: My SLO
  name: my-datadog-slo
  project: my-project
spec:
  budgetingMethod: Occurrences
  description: ""
  indicator:
    metricSource:
      name: datadog
  service: my-service
  objectives:
  - target: 0.7
    countMetrics:
      good:
        datadog:
          query: sum:trace.http.request.hits.by_http_status{http.status_class:2xx}.as_count()
      incremental: false
      total:
        datadog:
          query: sum:trace.http.request.hits.by_http_status{*}.as_count()
    displayName: available1
    value: 1
  timeWindows:
  - count: 1
    isRolling: true
    unit: Hour
Important notes:
Metric queries in Datadog are described in the Querying metrics | Datadog documentation.
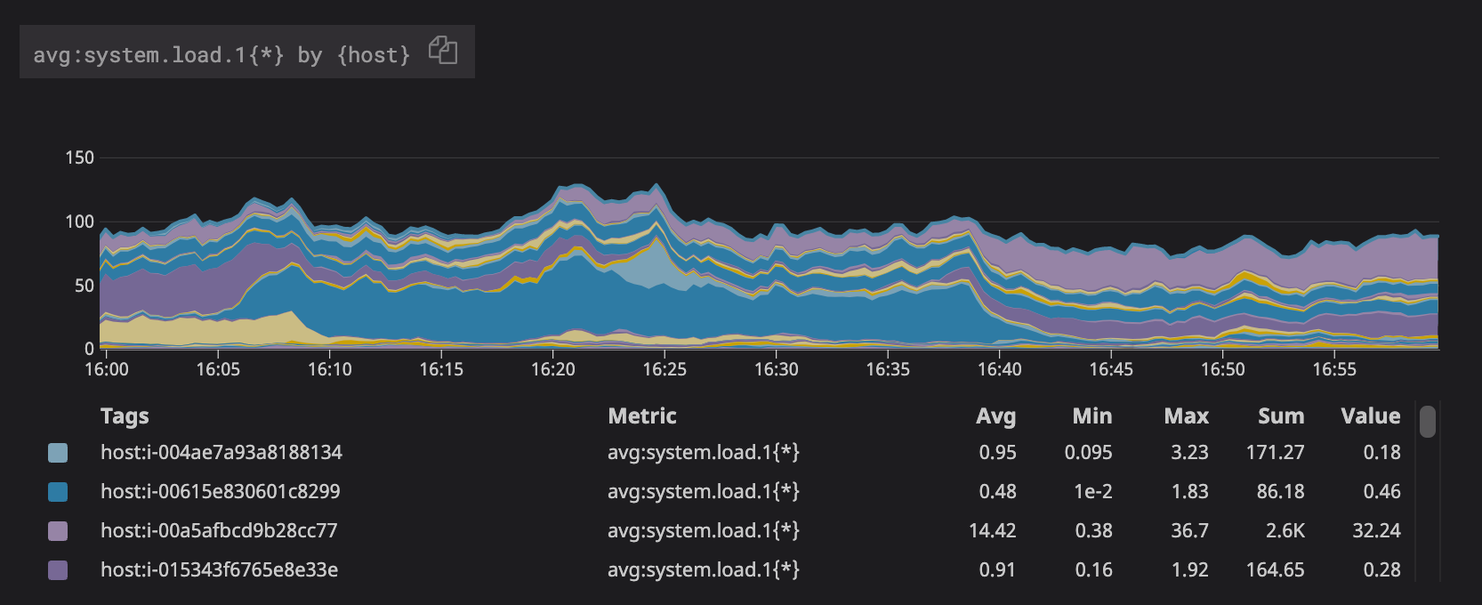
It is important to define queries in such a way that they return only one time series.
Example:
❌ Grouping metrics will often result in a multiple time series:
avg:system.load.1{*} by {host}
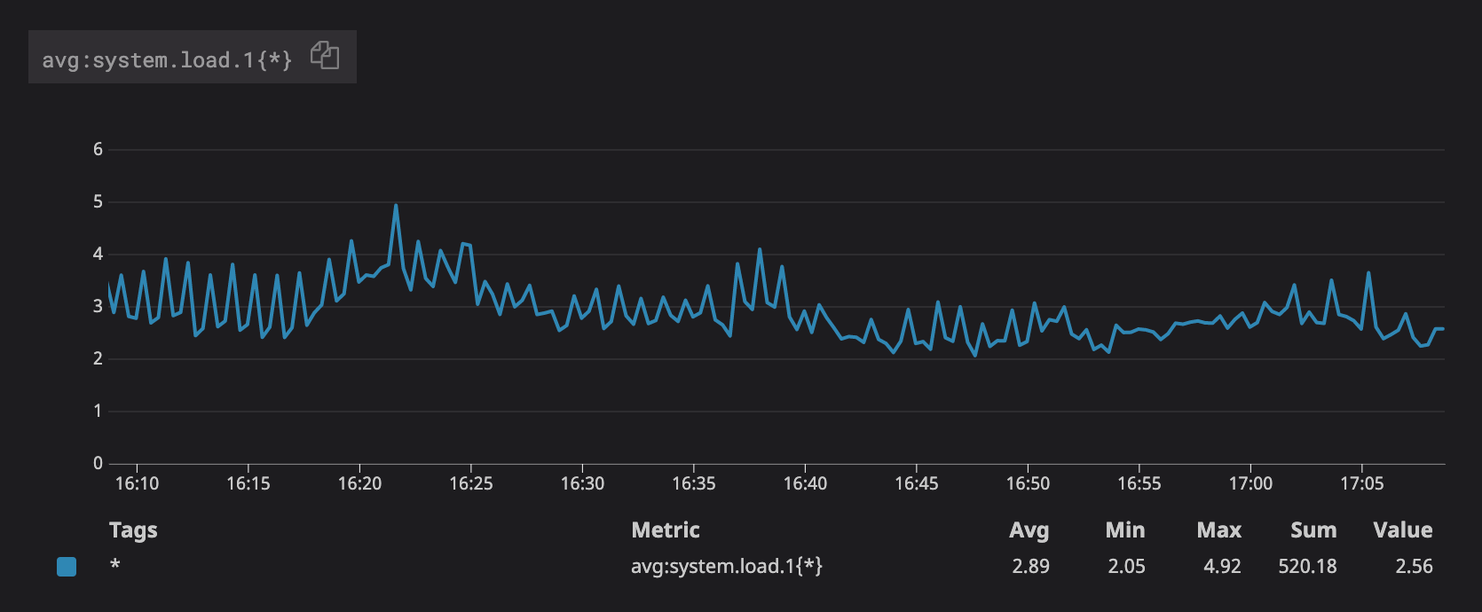
✔ Same query without grouping
avg:system.load.1{*}
It is strongly suggested to not use .rollup() or .moving_rollup() functions in your queries (see Rollup | Datadog documentation).
Nobl9 agent uses enforced rollup
described in the Rollup Interval: Enforced vs Custom | Datadog documentation
to control the number of points returned from the queries.
Using .rollup() or .moving_rollup() can affect the number of returned points or the way they are aggregated.
This fact, in conjunction with the time range of each query Nobl9 agent, makes, can skew the calculated error budgets.
Querying the Datadog server
The Nobl9 agent leverages the Query Timeseries API | Datadog documentation parameters at a two-minute interval.
Nobl9 sends an API request containing a batch of queries against the Datadog API. The API request can contain multiple queries separated by a comma with a limit of 1024 characters per request. If the character limit is exceeded, the Nobl9 agent will create another API request.
One incorrectly defined query has an impact on other SLOs with correct query definitions. Providing an invalid query causes loss in results for all other queries batched in the same API request.
For example, when you define an SLO with an incorrect Datadog query, the results for the other SLOs using Datadog as a data source are lost.
Datadog API rate limits
Requests to Datadog’s API are rate limited. For more information, refer to the Rate Limits | Datadog documentation.
The default rate limit for the Query Timeseries API call is 1600 per hour per organization. This limits the single-query integration to query up to 26 metrics with the one-minute interval.
Useful links
Nobl9 Integration with Datadog | Datadog documentation
Rollup Interval: Enforced vs Custom | Datadog documentation
Rate Limits | Datadog documentation