sloctl user guide
sloctl is a command-line interface (CLI) for Nobl9. You can use the sloctl CLI for creating or updating multiple SLOs and objectives at once as part of CI/CD.
The web user interface is available to give you an easy way to create and update SLOs and other resources, while sloctl aims to provide a systematic and/or automated approach to maintaining SLOs as code.
For other ways of leverging SLOs as code, check SLOs as code section.
Key features of sloctl
- CI/CD integration:
sloctlintegrates seamlessly with CI/CD pipelines. - Version control: You can keep definitions of SLOs and other resources in the version control system.
- Bulk operations:
sloctlallows you to create or update multiple SLOs and other Nobl9 resources simultaneously. - Advanced configuration:
sloctlprovides access to advanced functionalities through YAML-based resources definitions, including (but not limited to):- Complex alert policies:
sloctlyou to define alert policies with any number and combination of alert conditions, exceeding the limitations of the Nobl9 Web (one condition of a type). - Credential retrieval: With the
sloctl get agentscommand, you can retrieveclient_idandclient_secretfor agents within your organization at any time.
- Complex alert policies:
Setting up sloctl
Use the following steps to install and configure Nobl9 command-line interface, sloctl.
Binary installation of sloctl
When installing files in protected folders, the operating system occasionally requires copy or file permissions. When this happens, give the installed files executable permissions (Linux and Mac) or confirm the file copy operation (Windows).
Use the platform-specific instructions below to install sloctl.
Check sloctl releases page for the latest executable binary file for sloctl.
- MacOS
- Windows
- Linux
- Go!
Method 1: Using homebrew:
- For Mac OS, we recommend using
homebrew:tap nobl9/sloctl
brew install sloctl
Method 2: Manual installation
-
After the executable zip file downloads, you will need to place the file in the appropriate system path and rename it to sloctl.
- The Mac operating system occasionally requires file permissions. When this happens, give the file executable permission.
-
Move the binary file to your Downloads folder.
-
Open Terminal and enter the following commands:
sudo mkdir -p /usr/local/bin
sudo cp ~/Downloads/sloctl /usr/local/bin/
sudo chmod a+rx /usr/local/bin/sloctl
open /usr/local/bin -
The last
opencommand above will navigate to thebinfolder in Finder. -
Right-click sloctl in the Finder window and select Open.
Open is not the default option when the security modal pops up. Selecting Open authorizes the sloctl binary on your Mac.
The method of installation will vary slightly depending on your system role:
- Download the appropriate executable binary file from the sloctl releases page.
- Depending on your system role:
- If you're Admin: Create the directory
C:\Program Files\nobl9. - If you're User: Create a
nobl9folder in your user directory.
- Rename the file to
sloctl.exe. - Copy the
sloctl.exefile from the folder you downloaded it to thenobl9folder created in the first step.
If you're not Admin, you must add .exe Directory to the System Path Variable. Follow the steps below to finish your installation:
- Navigate to Control Panel > System and Security > System and click Advanced system settings.
- Click the Advanced tab in the System Properties page, and click Environment Variables.
- Navigate to User variables for username section, and select Path.
- Navigate to System Variables and select Path (If you only have access to the user variables, then make the update there.)
- Click Edit.
- Add the directory where you placed the file.
- Click OK.
- Download the appropriate binary executable file from sloctl release pages.
- Move the binary file to where the $PATH is pointing at, for example:
/usr/local/bin. - Rename the binary file to
sloctl - The Linux operating system occasionally requires file permissions. When this happens, give the file executable permission.
- Finally, type
sloctlto run the program.
Go! install
go install github.com/nobl9/sloctl/cmd/sloctl@latest
Homebrew
brew tap nobl9/sloctl
brew install sloctl
Docker
docker pull nobl9/sloctl
Build Docker image locally
-
Download Dockerfile and latest linux sloctl binary from the releases page. Make sure they're in your working directory.
-
Build the image:
docker build -t <NAME_YOUR_IMAGE> . -
Set environment variables if you plan to use them for authenticating with SLOCTL. Reference the sloctl environment variables doc.
-
Run the image:
docker run
-e SLOCTL_CLIENT_ID=$SLOCTL_CLIENT_ID \
-e SLOCTL_CLIENT_SECRET=$SLOCTL_CLIENT_SECRET \
<YOUR_IMAGE_NAME> get slos --no-config-file
Configuration
Follow these steps to configure your sloctl connection:
-
Create a Client ID and Client Secret pair for use in
sloctl:-
Navigate to Settings > Access Keys in the web UI.
-
Click Create Access Key.
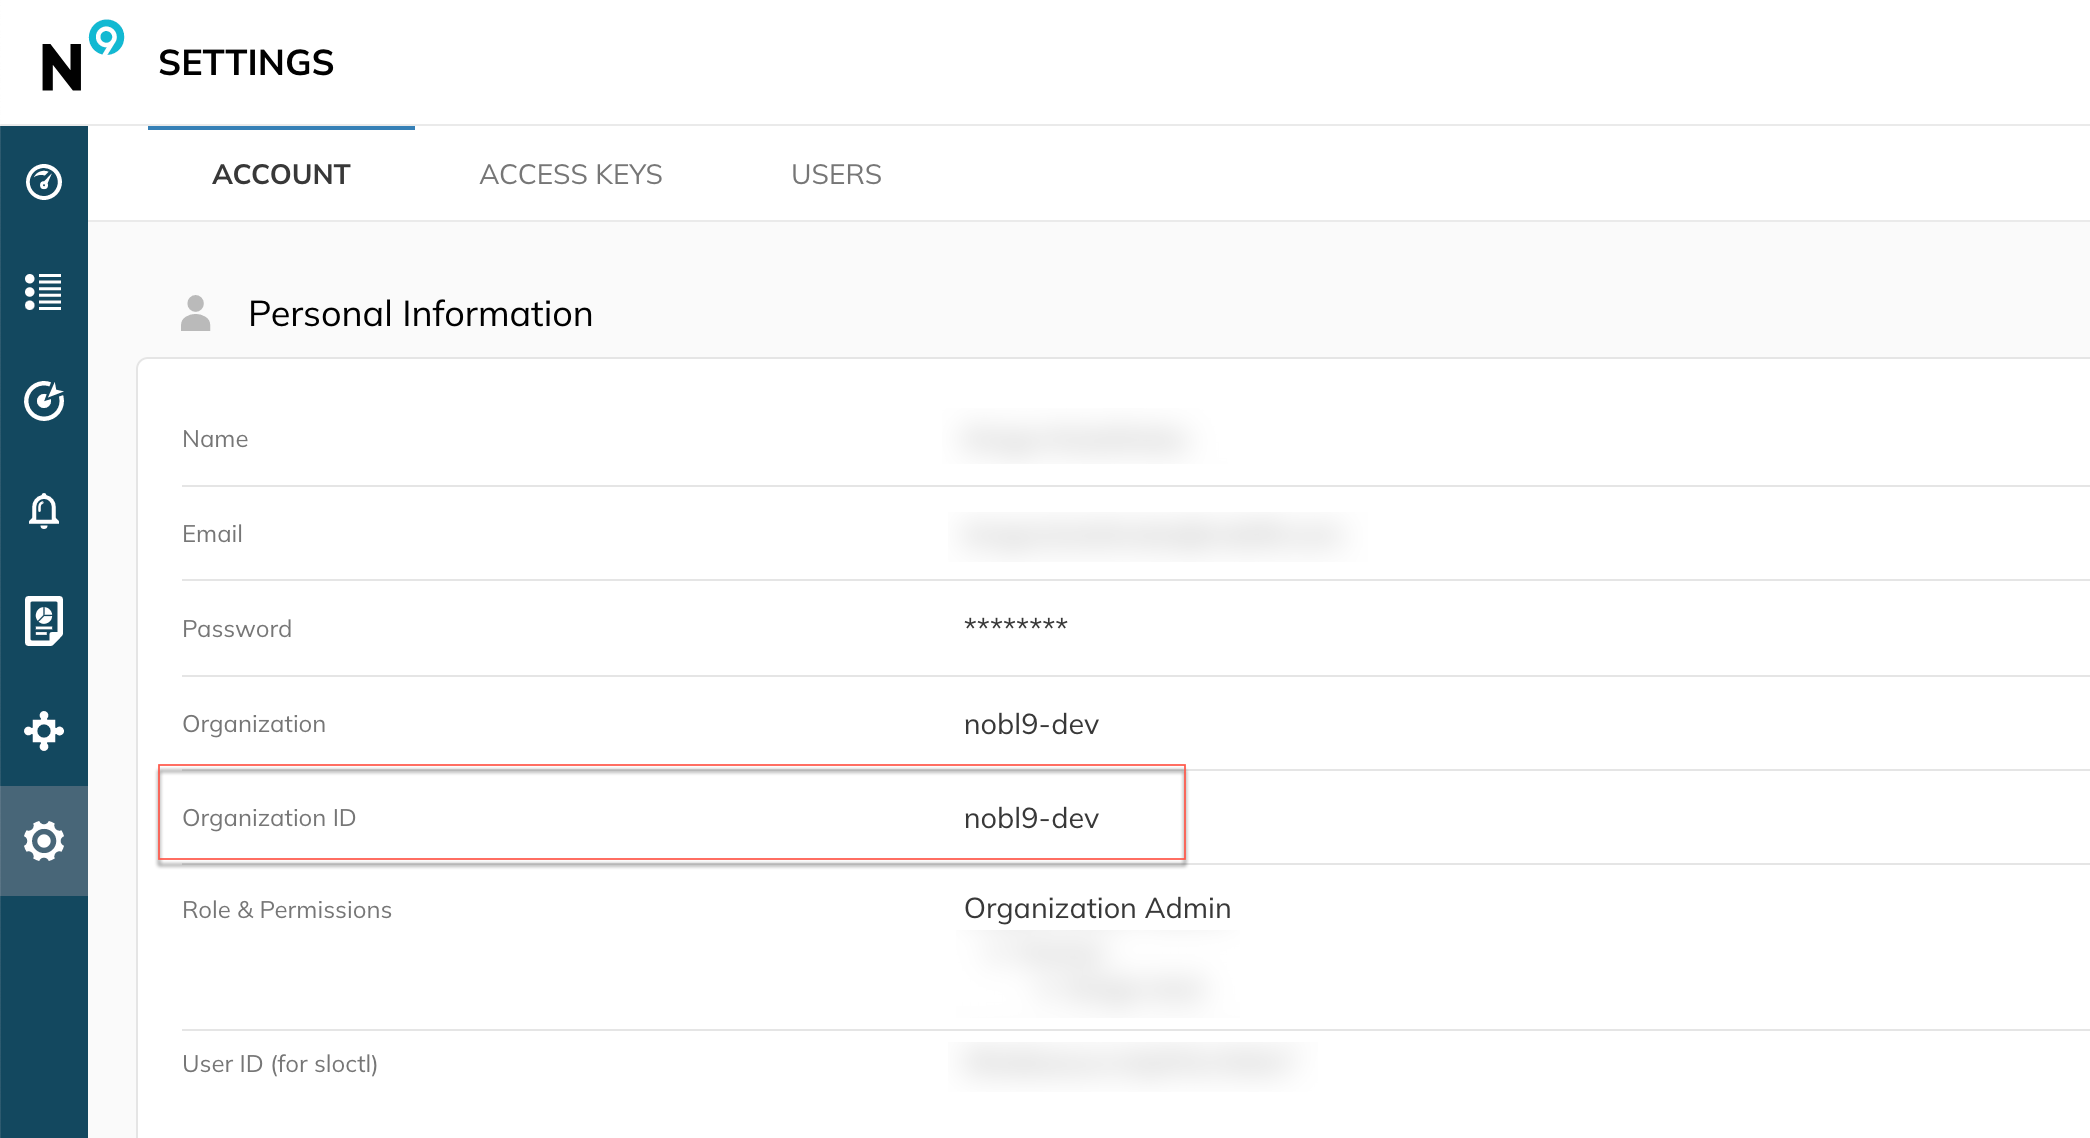
tipYou can retrieve agents'
client_idandclient_secretthrough thesloctl get agents -kcommand. See below for details.noteYou can retrieve your organization ID on the Nobl9 Web, in the Settings > Account:
-
-
Follow the instructions in the UI to configure
sloctlto use the provided credentials. Use one of the available setup flows:-
Method 1:
Click Download credentials file in the web UI, and put the downloaded file in~/.config/nobl9/config.toml(Linux and macOS) or%UserProfile%\.config\nobl9\config.toml(Windows). -
Method 2:
Runsloctl config add-context, name the context, and paste the Client ID and Client Secret from the web UI when prompted. -
Method 3:
You can also passsloctlconfiguration through the environment variables: either to overwrite your settings from config.toml, or pass them directly without aconfig.tomlfile. See below for details.
-
-
Test the configuration by entering
sloctl get slosinto the command line.
If there are no SLOs created in your account or in the selected project, you might see this message: No resources found in default project. This indicates that the configuration is correct; if it’s not, the command will return a 401 error.
Configure sloctl with environmental variables
If you don't want sloctl to create any configuration files in your homepath, you can configure it by passing the following environmental variables:
| Variable name | Description | Mandatory? |
|---|---|---|
SLOCTL_CLIENT_ID | Set your Nobl9 client ID. | Y |
SLOCTL_CLIENT_SECRET | Set your Nobl9 client secret. | Y |
SLOCTL_CONTEXT | Set your sloctl context. | N |
SLOCTL_PROJECT | Set your Nobl9 project. | N |
SLOCTL_TIMEOUT | Set custom timeout for applying objects. Max. value = 1 minute. | N |
SLOCTL_FILES_PROMPT_THRESHOLD | Set custom prompt threshold for applying multiple files (numeric value). | N |
SLOCTL_FILES_PROMPT_ENABLED | Set sloctl prompt message for applying multiple files (boolean) | N |
sloctl image
Nobl9's sloctl image is published on Docker Hub. You can leverage it to integrate Nobl9 in the CI/CD pipelines.
Configuration
Follow these steps to use the sloctl image:
- Pull the
sloctldocker image by entering the following command:
docker pull nobl9/sloctl:latest
- Test it by running the following:
docker run nobl9/sloctl:latest --help
sloctl is the entrypoint. As such, when entered on the command line, commands do not have to be preceded by sloctl, for example: docker run nobl9/sloctl:latest --help.
If you want to leverage the sloctl image for commands that require authentication, you must pass your Client ID and Client Secret. You can do it by:
- Passing your
config.tomlfile - Passing your secrets to Docker as environment variables.
- config.toml
- Env Variables
Follow the steps below to pass your config.toml file to the Docker container:
- Download your
config.tomlfile from the Nobl9 UI and follow the instructions described in the Configuration section. - Move
config.tomlto a directory of your choice. - Set the environment variable to the full path where your
config.tomlis located, for example:export N9_AUTH=‘/full/path/to/directory‘
Run the following Docker command to pass your Client ID and Client Secret to Docker as environment variables:
docker run
-e SLOCTL_CLIENT_ID=$SLOCTL_CLIENT_ID \ # mandatory, your Client ID
-e SLOCTL_CLIENT_SECRET=$SLOCTL_CLIENT_SECRET \ # mandatory, your Client Secret
-e SLOCTL_CONTEXT=$SLOCTL_CONTEXT \ # optional
-e SLOCTL_PROJECT=$SLOCTL_PROJECT \ # optional
-e SLOCTL_FILES_PROMPT_THRESHOLD=30 \ # optional
-e SLOCTL_FILES_PROMPT_ENABLED=true \ # optional
nobl9/sloctl:latest apply -f '**'
Notes:
SLOCTL_CONTEXT and SLOCTL_PROJECT are optional variables that you can pass along with your secrets.
Refer to the section above for more information about sloctl environmental variables.
Use cases
When you applied the authentication config file, you can test it by running docker run command with the -v flag for bind mounting the directory. The command should return all your SLOs.
docker run -v $N9_AUTH:/home/appuser/.config/nobl9 nobl9/sloctl:latest get slos
Note that sloctl is expecting to find your config file at /home/appuser/.config/nobl9 from within the container.
You can now run other sloctl commands with the same line by changing the sloctl command at the end, for example:
docker run -v $N9_AUTH:/home/appuser/.config/nobl9 nobl9/sloctl:latest <sloctl command>
Overview of sloctl commands and objects
Summary of root sloctl commands
The following are the available commands in sloctl. When entered on the command line they should all be preceded by sloctl; for example, sloctl delete.
| Command | Description |
|---|---|
apply | Apply a resource definition in YAML or JSON format. |
aws-iam-ids | Outputs AWS IAM IDs, available for dataexport and direct:
|
completion | Generate the autocompletion script for sloctl for the specified shell. |
delete | Delete a resource definition (specified by name or definition file). |
get | Display one or more resources. |
help | Get help on any command. |
replay | Get historical data for an SLO. |
use-context | Set the default context. |
version | Print the sloctl version. |
For more details, see the sloctl Root Commands section below.
Summary of sloctl config commands
The following are the available config commands in sloctl.
In the command line, they should all be preceded by sloctl config; for example, sloctl config use-context:
| Command | Description |
|---|---|
add-context | Add a new sloctl configuration context. |
current-context | Display current context. |
delete-context | Delete chosen context. |
get-contexts | Display all available contexts. |
rename-context | Rename chosen context. |
use-context | Set the default context. |
For more details, see the sloctl Config Commands section below.
Common objects
The following are the API objects that you can manipulate with sloctl using the different commands. For details about each object, see the YAML Guide.
Object arguments follow the [command] argument in the sloctl command line:
sloctl [command] [object]
For example:
sloctl get agents
| Object | Description |
|---|---|
agents | Provide a solution to metrics collection from external sources. In this solution, users deploy the agents. |
alertmethods | Allow you to send alerts to specific notification engines or tools when an incident is triggered. |
alertpolicies | Define a set of conditions that, when met, cause an alert to be a sent to a predefined list of integrations. |
alertsilences | Silence alerts for a defined period not to receive notifications when an alert event is triggered. |
alerts | Allow notifications to be sent about SLOs when certain conditions are met. |
annotations1 | Allows you to add annotations and manage them on the SLO or SLO objective level. |
dataexports | Define a configuration to export your data from Nobl9. |
directs | Provide a SaaS solution to metrics collection from external sources. |
projects | Serve as workspaces for resources and provide a layer of isolation for resources in different projects. |
rolebindings | Assign a user the permissions indicated in a role. |
services | Serve as high-level groupings of SLOs. |
slos | Define a set of target values for an SLO. |
1 sloctl does not return system annotations. When applying the sloctl get annotation[s] command, sloctl will return only annotations created by the user.
Flags
Common flags pass data to a command or parameter:
| Flag | Long Form | Description |
|---|---|---|
-h | --help | Get help. |
-o | --output string | Specify the output format: one of `yaml |
Certain sloctl commands accept other flags. Global flags define the scope of the current command, such as the project, context, or location of the configuration file:
| Flag | Long form | Description |
|---|---|---|
-A | --all-projects | Display the objects from all of the projects. |
--config string | Specify the path to the config file (without this flag, sloctl checks in %UserProfile%\.config\nobl9\config.toml on Windows and ~/.config/nobl9/config.toml on other operating systems). | |
-c | --context string | Override the default context for the duration of the command. |
--no-config-file | Don't create config.toml, operate only on env variables. | |
-p | --project string | Override the default project from the active context for the duration of the command. |
sloctl root commands
apply
The apply command commits your changes by sending the updates to the application.
sloctl apply supports glob patterns when using the -f flag. It uses the standard Go glob patterns grammar and extends it with the support of '**' for recursive reading of files and directories.
The default threshold for multiple applied files is 23. You can use the -y flag in the command (sloctl apply -y -f [...]) to auto-confirm applying multiple files, or set a custom threshold through the environmental variables.
Otherwise, when that threshold is exceeded, sloctl will produce the following prompt message:
You're applying more than 23 files (30). Do you want to continue? (y/n)
Applying multiple objects through glob patterns might fail due to timeouts.
You can extend the timeout in your config.toml file by adding the following line to the relevant context, for example:
[Contexts.production]
    clientId = ""
    clientSecret = ""
    project = "default"
    organization = "production"
    timeout = "1m" # Maximum value = 1 minute. If set to >1m, it defaults to 1m.
    filesPromptThreshold = "30" # Custom threshold for applying multiple files.
    filesPromptEnabled = "false" # Enable/disable prompt for applying multiple files.
Only files with extensions: .yml, .yaml, and .json are processed when using glob patterns.
Additionally, before processing the file contents, sloctl checks if it contains Nobl9 API version with the following regex: "?apiVersion"?\s*:\s*"?n9.
Example usage:
sloctl apply [flags]
Examples:
-
Apply the configuration from slo.yaml:
sloctl apply -f ./slo.yaml -
Apply the YAML file to deploy the agent:
sloctl apply -f ./agent.yamlnoteYou can deploy only one agent in one YAML file.
-
Apply the YAML file to configure the Direct connection:
sloctl apply -f ./direct.yamlnoteBe careful with your authentication credentials provided in the
directYAML configuration. Remember that these values are encrypted and safely stored in the Nobl9. -
Apply resources from multiple different sources at once:
sloctl apply -f ./slo.yaml -f test/config.yaml -f <<https://my-definition.com/slo.yaml>> -
Apply the YAML or JSON passed directly into stdin:
cat slo.yaml | sloctl apply -f - -
Apply the configuration from slo.yaml and set the project if it is not defined in the file:
sloctl apply -f ./slo.yaml -p slo -
Apply the configurations from all the files located at cwd recursively:
sloctl apply -f '**' -
Auto-confirm applying multiple files:
sloctl apply -y -f '**' -
Apply the configurations from files with the 'annotations' name within the whole directory tree. Remember that glob patterns must be quoted to prevent the shell from evaluating them:
sloctl apply -f '**/annotations*' -
Apply SLO(s) from
slo.yamland reimport its/their data from2023-03-02T15:00:00Zuntil now:sloctl apply -f ./slo.yaml --replay --from=2023-03-02T15:00:00Z- When you provide the
--dry-runwith replay flags,sloctlwill not execute Replay.
- When you provide the
--replay- This functionality allows you to create SLOs and run Replay for them in a single step. It will also work for existing SLOs
- If any or all Replays fail, the applied changes won't be rolled back
- There's no fine-granulated control over the Replays run for multiple SLOs. Unlike
sloctl replaycommand,sloctl apply --replayonly allows setting a single--fromparameter to configure the Replay time window for all applied SLOs - YAML definitions provided with the
-fflag may contain many objects and multiple SLOs. Thesloctl applycommand will run Replay only for SLOs
Flags:
| Flag | Long form | Description |
|---|---|---|
--dry-run | Submits server-side request without persisting the configured resources. | |
-f | --file string | Provide a file path, glob pattern or a URL to the configuration in YAML or JSON format. This option can be used multiple times. |
--from time | Configure the start of Replay time window (RFC3339 format). See replay command below. | |
-h | --help | Get help. |
--replay | Run Replay for applied SLOs. If replay fails, applied changes will not be rolled back. | |
-y | --yes | Auto-confirm applying multiple files. |
When passed with the apply command, the --dry-run flag tests if your YAML definitions are correct. Note that currently, the command provides a basic validation of YAML definitions: it acts like an apply command without persisting the changes.
Global flags:
| Flag | Long form | Description |
|---|---|---|
-A | --all-projects | Display the objects from all of the projects. |
--config string | Specify the path to the config file (without this flag, sloctl checks in %UserProfile%.config\nobl9\config.toml on Windows and ~/.config/nobl9/config.toml on other operating systems). | |
-c | --context string | Override the default context for the duration of the command. |
--no-config-file | Don't create config.toml, operate only on env variables. | |
-p | --project string | Override the default project from the active context for the duration of the command. |
Available objects:
agents,alertmethods,alertpolicies,alertsilences,alerts,annotations,dataexports,directs,projects,rolebindings,services,slos
Use sloctl apply [object] --help for more information about using the apply command with different objects.
When the specified changes have been applied successfully, you will see the following confirmation message:
sloctl apply -f ./samples/sample.yaml

Resources successfully created.
completion
The completion command generates the autocompletion script for sloctl for the specified shell.
Example usage:
sloctl completion [command]
Available commands
| Command | Description |
|---|---|
bash | Generate the autocompletion script for bash. |
fish | Generate the autocompletion script for fish. |
powershell | Generate the autocompletion script for PowerShell. |
zsh | Generate the autocompletion script for zsh. |
Flags:
| Flag | Long form | Description |
|---|---|---|
-h | --help | Get help. |
Global flags:
| Flag | Long form | Description |
|---|---|---|
-A | --all-projects | Display the objects from all of the projects. |
--config string | Specify the path to the config file (without this flag, sloctl checks in %UserProfile%\.config\nobl9\config.toml on Windows and ~/.config/nobl9/config.toml on other operating systems). | |
-c | --context string | Override the default context for the duration of the command. |
--no-config-file | Don't create config.toml, operate only on env variables. | |
-p | --project string | Override the default project from the active context for the duration of the command. |
delete
The delete command allows users to delete different resources.
sloctl delete supports glob patterns when using the -f flag. It uses the standard Go glob patterns grammar and extends it with the support of '**' for recursive reading of files and directories.
The standard Go grammar can be found here.
Applying multiple objects through glob patterns might fail due to timeouts.
You can extend the timeout in your config.toml file by adding the following line to the relevant context, for example:
[Contexts.production]
    clientId = ""
    clientSecret = ""
    project = "default"
    organization = "production"
    timeout = "1m" # Maximum value = 1 minute. If set to >1m, it defaults to 1m.
Only files with extensions: .yml, .yaml, and .json are processed when using glob patterns.
Additionally, before processing the file contents, sloctl checks if it contains Nobl9 API version with the following regex: "?apiVersion"?\s*:\s*"?n9.
Example usage:
  sloctl delete [flags]
  sloctl delete [command]
Examples:
-
Delete the configuration from slo.yaml:
sloctl delete -f ./slo.yaml -
Delete resources from multiple different sources at once:
sloctl delete -f ./slo.yaml -f test/config.yaml -f <<https://my-definition.local/slo.yaml>> -
Delete the YAML or JSON passed directly into stdin:
cat slo.yaml | sloctl delete -f - -
Delete specific resources by specifying their names:
sloctl delete slo my-slo-name -
Delete the configuration from slo.yaml and set the project context if it is not defined in the file:
sloctl delete -f ./slo.yaml -p slo -
Delete the configurations from all the files located at cwd recursively.
sloctl delete -f '**' -
Delete the configurations from files with the 'annotations' name within the whole directory tree. Remember that glob patterns must be quoted to prevent the shell from evaluating them.
sloctl delete -f '**/annotations*'
Available objects:
agents,alertmethods,alertpolicies,alertsilences,alerts,annotations,dataexports,directs,projects,rolebindings,services,slos
For details, see Common Objects.
Flags:
| Flag | Long form | Description |
|---|---|---|
-f | --file string | Provide a file path, glob pattern or a URL to the configuration in YAML or JSON format. This option can be used multiple times. |
-h | --help | Get help. |
--dry-run | Submits server-side request without persisting the configured resources. |
When passed with the delete command, the --dry-run flag tests if your YAML definitions are correct. Note that currently, the command provides a basic validation of YAML definitions: it acts like a delete command without persisting the changes.
Global flags:
| Flag | Long form | Description |
|---|---|---|
-A | --all-projects | Display the objects from all of the projects. |
--config string | Specify the path to the config file (without this flag, sloctl checks in %UserProfile%\.config\nobl9\config.toml on Windows and ~/.config/nobl9/config.toml on other operating systems). | |
-c | --context string | Override the default context for the duration of the command. |
--no-config-file | Don't create config.toml, operate only on env variables. | |
-p | --project string | Override the default project from the active context for the duration of the command. |
Use sloctl delete [object] --help for more information about using the delete command with different objects.
When the specified objects have been deleted successfully, sloctl shows the following confirmation message:
sloctl delete -f example.yaml

The resources were successfully deleted.
get
The get command prints a table of the most important information about the specified resources.
Example usage:
sloctl get [object]
Available objects:
agents,alertmethods,alertpolicies,alertsilences,alerts,annotations,dataexports,directs,projects,rolebindings,services,slos
For details, see Common Objects.
sloctl doesn't return system annotations. When applying the sloctl get annotation[s] command, sloctl will return only annotations created by the user.
*In Nobl9 release 1.66.2-3, the previous response from sloctl get alertpolicies is deprecated, and will be phased out in the future.
In subsequent updates, the command will return only the metadata.name and metadata.project fields associated with the alert policy (instead of returning the entire block for the alertMethods object):
apiVersion: n9/v1alpha
kind: AlertPolicy
metadata:
  ...
spec:
  ...
  alertMethods:
    - metadata:
        name: my-alert-method
        project: my-project
We'll inform you about the full phase-out in a separate announcement.
Flags:
| Flag | Long form | Description |
|---|---|---|
-h | --help | Get help. |
-k | --with-keys | Display client_secret and client_id (available only for sloctl get agents). |
-l | --labels | Filter resources by label. For example: key=value,key2=value2,key2=value3. |
-o | --output string | Specify the output format: one of `table |
Global flags:
| Flag | Long form | Description |
|---|---|---|
-A | --all-projects | Display the objects from all of the projects. |
--config string | Specify the path to the config file (without this flag, sloctl checks in %UserProfile%\.config\nobl9\config.toml on Windows and ~/.config/nobl9/config.toml on other operating systems). | |
-c | --context string | Override the default context for the duration of the command. |
--no-config-file | Don't create config.toml, operate only on env variables. | |
-p | --project string | Override the default project from the active context for the duration of the command. |
Use sloctl get [object] --help for more information about using the get command with different objects.
Notes:
-
If there are no objects of the given type associated with the given project,
sloctlreturns the following message:sloctl get slo
No resources found in 'default' project. -
If a user provides a valid type (e.g.,
slo) without a mandatory name,sloctlreturns a list of objects:sloctl get slo
- apiVersion: n9/v1alpha
kind: SLO
metadata:
name: streaming-slo
project: default
spec:
...
- apiVersion: n9/v1alpha
kind: SLO
metadata:
name: streaming-other-slo
project: default
spec:
... -
If a user provides an object type and name,
sloctlreturns only the specific object:sloctl get slo streaming-other-slo
- apiVersion: n9/v1alpha
kind: SLO
metadata:
displayName: Streaming Other
name: streaming-other-slo
project: default
spec:
alertPolicies:
- budget-is-burning-too-fast
budgetingMethod: Occurrences
description: ""
indicator:
metricSource:
kind: Agent
name: prometheus-source
project: default
rawMetric:
prometheus:
promql: cpu_usage_user{cpu="cpu-total"}
objectives:
- displayName: Good
op: lte
tag: default.streaming-other-slo.100d000000
target: 0.9
value: 100
- displayName: Poor
op: lte
tag: default.streaming-other-slo.200d000000
target: 0.99
value: 200
service: webapp-service
timeWindows:
- count: 7
isRolling: true
period:
begin: "2021-04-28T13:09:35Z"
end: "2021-05-05T13:09:35Z"
unit: Day -
It is possible to pass multiple names, space-separated:
sloctl get slo streaming-other-slo streaming-latency-slo -
It is possible to combine flags. For instance, if you'd like to retrieve agents' secrets for all projects, you can use the following command:
sloctl get agents -Ak -
The
-kflag works only with thesloctl get agentscommand. It retrivesclient_idandclient_secretfor all agents in thedefaultproject. If you want to retrieveclient_idandclient_secretfor all agents in your organization, use the-Aflag as follows:sloctl get agents -Ak.cautionTo get
client_idandclient_secret, Nobl9 sends a request for every agent in your organization. It means that every additional Nobl9 agent in your organization increases the waiting time for a response fromsloctl.To reduce the waiting time, we recommend specifying in your sloctl command agents' names for which you want to retrieve the
client_idandclient_secret, for example:sloctl get agents my-agent1 my-agent2
get alerts
Get alerts based on search criteria. You can use specific criteria using flags to find alerts related to specific SLO, objective, service, alert policy, time range, or alert status.
For example, you can use the same flag multiple times to find alerts triggered for a given SLO OR another SLO. Keep in mind that the different types of flags are linked by the AND logical operator.
sloctl get alerts returns alerts triggered in a given project only (alert project is the same as the SLO project). If you don't have permission to view SLO in a given project, alerts from that project will not be returned.
sloctl get alerts returns all active (unresolved) alerts that were or are active in the period defined by the --from and --to flags.
For example, if you select, the period for today between 12:00-13:00 and there was an alert triggered a week ago which is still unresolved, the sloctl get alerts command will also return such an alert.
Example usage:
sloctl get alerts [flags]
Aliases:
alerts, alert
Examples:
-
Get all alerts triggered in my organization (max 1000).
sloctl get alert -A- If you exceed this limit, sloctl will return the following warning message:
Warning: 1000 new alerts have been returned from the API according to the provided searching criteria. Specify more restrictive filters (by SLO, objective, service, alert policy, time range, or alert status) to get more limited results. -
Get only active (not resolved yet) alerts in my organization.
sloctl get alert --triggered -A -
Get a specific alert by the alert ID.
sloctl get alert ce1a2a10-d74d-477f-b574-b278ee54e02b -A -
Get alerts related to the
reportsapiservice orusersapiservice in projectprod.sloctl get alert --service reportsapi --service usersapi -p prod -
Get resolved alerts for the specific alert policy and SLO in the specified project only.
sloctl get alert --resolved --alert-policy slow-burn --slo usersapi-latency -p prod -
Get alerts triggered for the slo
usersapi-availabilityAND objectiveobjective-1in projectprod.sloctl get alert --slo usersapi-availability --objective objective-1 -p prod -
Get alerts triggered for slo
usersapi-latencyAND objectiveobjective-1ORobjective-2in projectprod.sloctl get alert --slo usersapi-latency --objective objective-1 --objective objective-2 -p prod -
Get alerts by a time range:
-
Alerts that were active yesterday:
sloctl get alert --from 2023-03-22T00:00:00Z --to 2023-03-22T23:59:59Z -A -
Alerts that were active yesterday and are still active now
sloctl get alert --from 2023-03-22T00:00:00Z -A -
Alerts that have been active until today:
sloctl get alert --to 2023-03-22T00:00:00Z -A
-
In rare situations, sloctl won't return some alerts. This might happen because:
sloctlreturns alerts for existing objects only (alert policies, SLOs, services, and objectives).- If you delete any objects,
sloctlwon't return alerts for them. - If you delete an SLO, alert policy, or service and recreate it with the same name,
sloctlwon't return results for it. - If you unlink an alert policy from an SLO,
sloctlwon't return alerts for it.
Flags:
| Flag | Long form | Description |
|---|---|---|
--alert-policy string | Get alerts triggered for a given alert policy (name) only. | |
--slo string | Get only alerts triggered for a given SLO (name). | |
--objective string | Get alerts triggered for a given objective name of the SLO only. | |
--service string | Get alerts triggered for SLOs related to a given service only. | |
--resolved | Get alerts that are resolved only. | |
--triggered | Get alerts that are still active (not resolved yet) only. | |
--from string | Get active alerts after from time only, based on metric timestamp (RFC3339), for example 2023-02-09T10:00:00Z. | |
--to string | Get active alerts before to time only, based on metric timestamp (RFC3339), for example 2023-02-09T10:00:00Z. | |
-h | --help | Help for the sloctl get alerts command. |
Additional alert details
Starting from the 1.74 release on Apr 4, 2023,
sloctl returns more detailed information about alerts triggered or resolved on the spec level.
When using the sloctl get alerts command, you can see data for each condition,
including the time of its onset (corresponds to the yellow interval in the alert chart), how long it lasted, and when it was last met.
Additionally, if the status is Resolved,
you can see when the cooldown period started and the reason for the resolution.
If an alert was canceled, the reason for cancellation is included as well.
| Specification | Description |
|---|---|
spec.conditions[].status.FirstMetMetricTime | The time at which the condition was first met, indicating when the metric value crossed the alert threshold for the first time. |
spec.conditions[].status.LastsForMetMetricTime | The duration for which the condition was met, even if the "lasts for" parameter is set to 0 minutes. |
spec.conditions[].status.LastMetMetricTime | The time at which the condition was last met, indicating when the metric value stopped meeting the alert threshold. |
spec.coolDownStartedAtMetricTime | The time at which the cooldown period started, applicable only for resolved alerts. |
spec.resolutionReason | The reason for resolution, particularly noteworthy for understanding why the alert was canceled. |
- Triggered alert
- Cancelled alert
The following YAML shows additional alert details for a triggered alert in lines 14–17 and 30-31.
apiVersion: n9/v1alpha
kind: Alert
  metadata:
    ...
  spec:
    alertPolicy:
      displayName: Remaining budget is <2%
      name: remaining-error-budget-is-2
      project: default
    conditions:
    - lastsFor: 1m0s
      measurement: burnedBudget
      op: gte
      status:
        firstMetMetricTime: "2024-04-26T12:10:15Z"
        lastMetMetricTime: "2024-04-26T12:11:15Z"
        lastsForMetMetricTime: "2024-04-26T12:11:15Z"
      value: 0.98
    coolDown: 5m0s
    objective:
      displayName: so-so
      name: objective-2
      value: 600
    service:
      ...
    severity: High
    slo:
      ...
    status: Triggered
    triggeredClockTime: "2024-04-26T12:13:05Z"
    triggeredMetricTime: "2024-04-26T12:11:15Z"
The following YAML shows additional alert details for a cancelled alert in lines 15–16, 24–26, and 33–34.
- apiVersion: n9/v1alpha
kind: Alert
metadata:
 ...
spec:
  alertPolicy:
    displayName: Fast Burn
    name: fast-burn
    project: azure-monitor-direct
  conditions:
  - lastsFor: 15m0s
    measurement: averageBurnRate
    op: gte
    status:
      firstMetMetricTime: "2024-04-16T16:45:00Z"
      lastMetMetricTime: "2024-04-23T16:29:00Z"
    value: 2
  ...
  coolDown: 5m0s
  objective:
    displayName: ""
    name: objective-1
    value: 1
  resolutionReason: AlertCanceledNewCalendarAlignedTimeWindow
  resolvedClockTime: "2024-04-23T16:36:10Z"
  resolvedMetricTime: "2024-04-23T16:30:00Z"
  service:
    ...
  severity: Medium
  slo:
    ...
  status: Canceled
  triggeredClockTime: "2024-04-19T16:36:08Z"
  triggeredMetricTime: "2024-04-19T16:30:00Z"
help (Start screen)
sloctl
sloctl -h
sloctl --help
Use this tool to work with definitions of SLOs in YAML files. For a list of commands available for execution, see Summary of sloctl Commands above.
For each command, more detailed help is available: use sloctl [command] --help for more information about a command.
Example usage:
sloctl [command] --help
Flags:
| Flag | Long form | Description |
|---|---|---|
-h | --help | Get help. |
Global flags:
| Flag | Long form | Description |
|---|---|---|
-A | --all-projects | Display the objects from all of the projects. |
--config string | Specify the path to the config file (without this flag, sloctl checks in %UserProfile%\.config\nobl9\config.toml on Windows and ~/.config/nobl9/config.toml on other operating systems). | |
-c | --context string | Override the default context for the duration of the command. |
--no-config-file | Don't create config.toml, operate only on env variables. | |
-p | --project string | Override the default project from the active context for the duration of the command. |
replay
Replay pulls in the historical data while your SLO collects new data in real-time. The historical and original data are merged, producing an error budget calculated for the entire period.
The replay command allows you to reimport data for multiple SLOs in bulk.
Before replaying an SLO, it verifies if this SLOs is eligible for replaying.
It will only run a single Replay simultaneously (the current limit for concurrent Replays).
When a Replay fails, it attempts replaying the next SLO. Replaying SLOs takes time: one Replay process may take several minutes up to an hour. During that time, the command keeps on running, periodically checking the status of Replay. If you cancel the program execution anytime, the current Replay in progress is not revoked.
- You can run
sloctl replayfor existing SLOs only. - To replay an SLO,
your role must be the Organization admin or Project editor in the project where your required SLO resides.
Learn more about RBAC. - Replaying composites is supported in
sloctl v0.3.0or higher.
Learn more about composites.
Example usage:
sloctl replay -p [project-name] --from=[YYYY-MM-DDTh:mm:ssZ] [slo-name]
Replaying existing SLOs is a permanent action and cannot be rolled back.
For more details, refer to Replay documentation.
Examples:
-
Replay SLO 'my-slo' in project 'my-project' data from 2023-03-02 15:00:00 UTC until now:
sloctl replay -p default --from=2023-03-02T15:00:00Z my-slo
-
Replay SLOs using file configuration from
replay.yaml:sloctl replay -f ./replay.yaml -
Read the configuration from stdin:
sloctl replay <./replay.yaml -
If the project is not set, it is inferred from Nobl9
config.tomlfor the current context.- If
fromis not provided in the config file, you must specify it with--fromflag. - Setting
projectorfromvia flags does not take precedence over the values set in config.
cat <<EOF | sloctl replay --from=2023-03-02T15:00:00Z
- slo: prometheus-latency # string, the name of the SLO for which you want to run Replay
  project: prometheus # string, the name of the project the SLO is in
  from: 2023-02-02T15:02:05Z # date in the RFC339 format from which Replay will run until now
- slo: datadog-latency
  project: datadog
  from: 2023-02-02T15:02:05+02:00
- slo: lightstep-latency
  project: lightstep
from: 2023-02-02T15:02:10+01:00 - If
-
Minimal config with parameters set globally via flags.
cat <<EOF | sloctl replay -p my-project --from 2023-03-02T15:00:00Z
- slo: prometheus-latency
- slo: datadog-latency
EOF
The reimport process for a single SLO may take up to an hour depending on:
- The length of the replayed period
- The number of objectives in your SLO
- The number of unique queries used in your SLO
Flags:
| Flag | Long form | Description |
|---|---|---|
-f | --file string | Provide a file path, glob pattern or a URL to the configuration in YAML or JSON format. This option can be used multiple times. |
--from date | Define a time point from which your historical data will be fetched until now. The value must be in the YYYY-MM-DDTh:mm:ssZ format compliant with RFC339. | |
-h | --help | Get help. |
Global flags:
| Flag | Long form | Description |
|---|---|---|
-A | --all-projects | Display the objects from all of the projects. |
--config string | Specify the path to the config file (without this flag, sloctl checks in %UserProfile%\.config\nobl9\config.toml on Windows and ~/.config/nobl9/config.toml on other operating systems). | |
-c | --context string | Override the default context for the duration of the command. |
--no-config-file | Don't create config.toml, operate only on env variables. | |
-p | --project string | Override the default project from the active context for the duration of the command. |
version
The version command prints the installed version of sloctl.
Usage:
sloctl version
The output includes the system architecture. For example:
sloctl/0.0.50-HEAD-bc7ec082 (linux amd64 go1.16.3)
sloctl config commands
sloctl config command allows you to manage configurations stored in the .toml configuration file.
Usage:
sloctl config [command]
Flags
| Flag | Long form | Description |
|---|---|---|
-h | --help | Help for config. |
Global Flags:
| Flag | Long form | Description |
|---|---|---|
-A | --all-projects | Display the objects from all of the projects. |
--config string | Specify the path to the config file (without this flag, sloctl checks in %UserProfile%.config\nobl9\config.toml on Windows and ~/.config/nobl9/config.toml on other operating systems). | |
-c | --context string | Override the default context for the duration of the command. |
--no-config-file | Don't create config.toml, operate only on env variables. | |
-p | --project string | Override the default project from the active context for the duration of the command. |
add-context
The add-context command adds a new sloctl configuration context.
A context in Nobl9 is a configuration you use to access the Nobl9 app with your user account. It is a set of access parameters that includes a Client ID, Client Secret, and a Project.
You can switch between different contexts depending on what project you wish to work against in sloctl. For this see the use-context command below.
Example usage:
sloctl config add-context
This is an interactive command that collects parameters in a wizard mode, as follows:
-
Set the context name.
New context name:Enter the context name and press Enter -
Set the Client ID. In the Nobl9 UI, the Client ID is generated by navigating to Settings > Access Keys > Create Access Key:
Client ID:Enter the Client ID and press Enter -
Set the Client Secret.
Client Secret:Enter the Client Secret and press Enter -
Set a default Project. The project can be overridden with the
-p(--project) flag in any command.Project [default]:Enter the default project name and press Enter -
Indicate whether the newly created context should be set as the default now.
Set '{context name from Step 1}' as a default context? [y/N]:Typey(for Yes) orn(for No) and press Enter.
noteHitting Enter without selecting
yorndefaults to No.
current-context
The current-context command displays configuration for the current context set in the configuration file.
Example usage:
sloctl config current-context
If you don't add any flags to the command, sloctl will return the following output:
default
If you add a -v (--verbose) flag to the command, sloctl will return the following output:
Example usage:
sloctl config current-context -v
Output:
context: default
  ClientID: # secret
  ClientSecret: # secret
  Project: default
delete-context
The delete-context command deletes one of the contexts in the configuration file.
The command requires exactly one argument with the context name.
Example usage:
sloctl config delete-context [contextName]
get-contexts
The get-contexts command displays one or many existing contexts.
Example usage:
sloctl config get-contexts
This command returns all user contexts. If you don't add any arguments to the command, sloctl will return the following output:
All available contexts [default, sandbox].
If you add a -v (--verbose) flag to the command, sloctl will return the following output:
All available contexts: [default, sandbox]

Context: default
	ClientID: # secret
	ClientSecret: # secret
  Project: default

Context: sandbox
	ClientID: # secret
	ClientSecret: # secret
	Project: default
If you specify one or more contexts in the command (sloctl config context-3 default -v), sloctl will return the following output:
All available contexts: [context-1, context-2, context-3, default, sandbox]

Context: context-3
	ClientID: # secret
	ClientSecret: # secret
	Project: default

Context: default
	ClientID: # secret
	ClientSecret: # secret
	Project: default
Flags:
| Flag | Long form | Description |
|---|---|---|
-h | --help | Get help. |
-v | --verbose | Get verbose output on the available contexts. |
Global flags:
| Flag | Long form | Description |
|---|---|---|
-A | --all-projects | Display the objects from all of the projects. |
--config string | Specify the path to the config file (without this flag, sloctl checks in %UserProfile%\.config\nobl9\config.toml on Windows and ~/.config/nobl9/config.toml on other operating systems). | |
-c | --context string | Override the default context for the duration of the command. |
--no-config-file | Don't create config.toml, operate only on env variables. | |
-p | --project string | Override the default project from the active context for the duration of the command. |
rename-context
The rename-context command renames one of the contexts in the configuration file.
The command requires exactly two arguments with names of your contexts.
Example usage:
sloctl config rename-context [oldContext] [newContext]
use-context
You can define multiple contexts in sloctl, and the use-context command allows you to choose the default context. It is helpful if the user belongs to multiple organizations or wants to switch between different default projects.
Also see the add-context command above.
Example usage:
The use-context command sets the default context for sloctl.
  sloctl config use-context [context-name] # non-interactive mode
  sloctl config use-context # interactive mode
When sloctl use-context is used in interactive mode and some contexts are already defined, the user is asked to select a context from the list (by typing its name at the prompt):
sloctl config use-context
    Select the default context from the existing contexts [default, sandbox]:
When no contexts have been defined yet, sloctl returns the following error:
  Error: You don't have any contexts in the current configuration file.
  Add at least one context in the current configuration file and then set it as the default.
  Run 'sloctl config add-context' or indicate the path to the file using flag '--config'.
Flags:
| Flag | Long form | Description |
|---|---|---|
-h | --help | Get help. |
Global flags:
| Flag | Long form | Description |
|---|---|---|
-A | --all-projects | Display the objects from all of the projects. |
--config string | Specify the path to the config file (without this flag, sloctl checks in %UserProfile%\.config\nobl9\config.toml on Windows and ~/.config/nobl9/config.toml on other operating systems). | |
-c | --context string | Override the default context for the duration of the command. |
--no-config-file | Don't create config.toml, operate only on env variables. | |
-p | --project string | Override the default project from the active context for the duration of the command. |
Common errors and warnings
The following are common errors/warnings that users may experience:
-
When a user applies a default context that does not exist:
sloctl config use-context not-existing-context

Error: There is no such context: 'not-existing-context'. Please enter the correct name. -
When a user wants to add a context that already exists:
sloctl config add-context
New context name: local

Context 'local' is already in the configuration file.
Do you want to overwrite it? [y/N]:
If the user answers
n(for No), the following message is shown:Please try to add a new context with a different name. -
When a context is configured with incorrect credentials, as in:
(config.toml context)
defaultContext = "local"

[Contexts]
   [Contexts.local]
       clientId = "xyz"
       clientSecret = "xyz"
and a user wants to invoke any command:
Error: error getting new access token from the customer identity provider: cannot access the token, customer identity provider replied with 401 {"errorCode":"invalid_client","errorSummary":"Invalid value for 'client_id' parameter.","errorLink":"invalid_client","errorId":"oaejFe6MwoIRo200IuIj7Hp1g","errorCauses":[]} -
When a user provides a path to an invalid file:
sloctl apply -f xyz.yaml

Error: error while reading provided file: open xyz.yaml: no such file or directory -
When a user provides an invalid context name:
sloctl config add-context
New context name: ^

Error: Enter a valid context name. Use letters, numbers, and `-` characters.
Use cases of SLO configurations
For detailed examples of how to create SLOs for sample services using sloctl, refer to the Getting started guide.
Useful links
sloctl releases