Nobl9 agent
The Nobl9 agent is a lightweight application for retrieving SLI metrics from data sources you configure and sending data back to the Nobl9 backend for processing and calculating the reliability of your system. You can run the agent in your Kubernetes cluster or as a Docker container.
The Nobl9 agent runs queries for your SLOs.
Nobl9's queries are tailored to the specific data source and sent using native APIs.
By default,
the Nobl9 agent queries a data source every minute to capture the last-minute data.
However, this frequency can be customized to fit your specific needs.
Starting from release 1.66, agent versions equal to or earlier than 0.55.3 are deprecated and rendered non-functional.
If any of your sources currently use deprecated agents, update them to the latest version.
Requirements and support
Systems supported by the Nobl9 agent:
linux/amd64linux/arm64
For the Nobl9 agent deployment, use any Kubernetes cluster or Docker environment.
A Docker environment on your local machine with proper firewall access is enough for testing purposes. However, we do not recommend using it past the initial test, as the data flow will stop when your machine sleeps.
We strongly recommend updating your agent regularly to get the most recent functionality.
| Latest stable version | Latest beta version | |
|---|---|---|
| Docker images | nobl9/agent:0.107.2 | nobl9/agent:0.107.2-beta |
| Command to run | docker pull nobl9/agent:latest | docker pull nobl9/agent:latest-beta |
To set up automatic agent updates during restarting,
replace the agent version number with the nobl9/agent:latest or nobl9/agent:latest-beta
tags in your Kubernetes or Docker configuration for agent deployment.
To stay informed about the latest improvements, bug fixes, and new features, see the Nobl9 agent release notes.
Creating the agent
To create the agent, do the following:
- Add a data source using the agent connection method on the Nobl9 Web or with
sloctl. - Deploy the created agent in a Kubernetes cluster or Docker container.
To ensure data transmission from your data source to Nobl9, it may be necessary to list Nobl9 IP addresses as trusted.
IP addresses to include in your allowlist for secure access
app.nobl9.com instance:- 18.159.114.21
- 18.158.132.186
- 3.64.154.26
us1.nobl9.com instance:- 34.121.54.120
- 34.123.193.191
- 34.134.71.10
- 35.192.105.150
- 35.225.248.37
- 35.226.78.175
- 104.198.44.161
Creating the agent on the Nobl9 Web
Follow these steps to create your agent in the UI:
- Go to Integrations.
-
Click
.
- Select the relevant source and choose Agent.
Find integration-specific details in the Agent Configuration in the UI section under the required data source page.
Creating the agent with sloctl
To create your agent with sloctl,
apply the YAML definition of your agent using the following command:
sloctl apply -f ./agent.yaml
- Find the source-specific YAML definition of agents under the Sources > Adding data sources > Your required data source > Agent connection method > sloctl section of this documentation.
- You can create only one agent in one YAML file.
- If you describe infrastructure as code, consider creating agents using the Nobl9 Terraform provider.
Deploying the Nobl9 agent
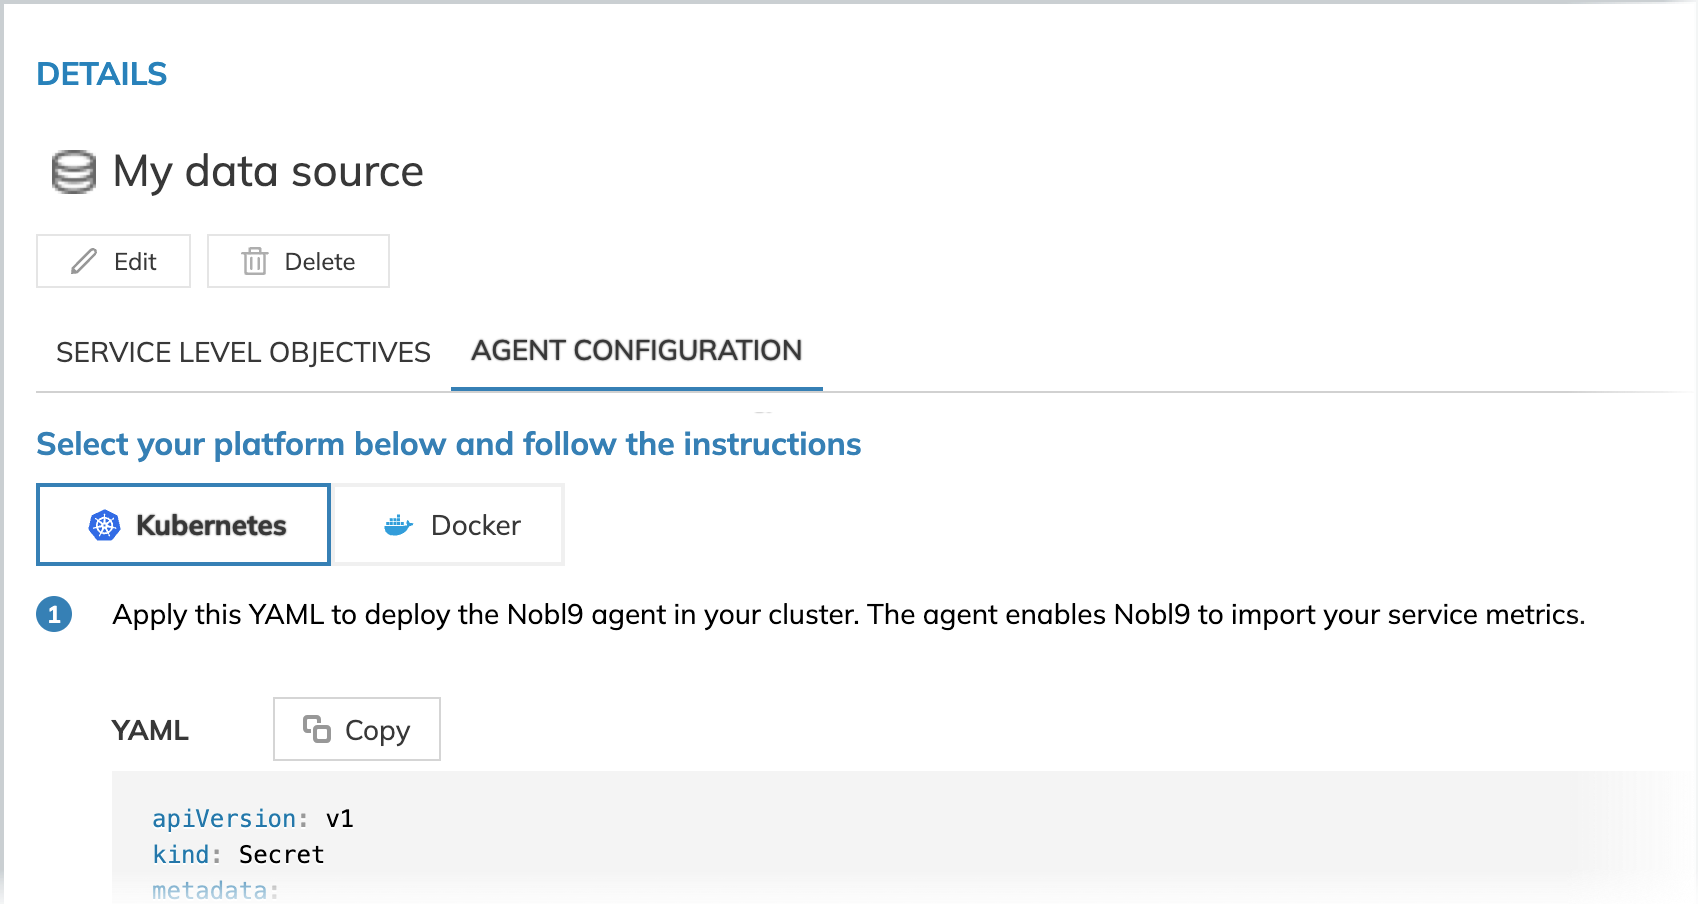
Once you add a new agent using the Nobl9 Web or applied your agent YAML definition with sloctl,
Nobl9 immediately generates a Kubernetes configuration and a Docker command line.
To find them, do the following:
- Go to the Integrations > Sources tab on the Nobl9 Web.
- Open details of your required data source. Go to the Agent configuration tab.

Deploying the agent in Kubernetes
To deploy your Nobl9 agent using Kubernetes, do the following:
Prerequisites: ensure you have access to the required Kubernetes cluster and the permissions to deploy resources.
- Copy the generated YAML.
- Apply the copied YAML to your Kubernetes cluster, replacing the placeholders with your actual values.
For example, using Helm. - Check the agent connection.
You can also pass the credentials as a mounted volume. For this, instead of the explicit secrets in your agent deployment configuration, use the path to the file with secrets.
-
Remove the
client_idandclient_secretinkind: Secret:client_id and client_secret under kind: SecretapiVersion: v1
kind: Secret
metadata:
name: nobl9-agent
namespace: default
type: Opaque
stringData:
client_id: "YOUR_CLIENT_ID"
client_secret: "YOUR_CLIENT_SECRET" -
Remove
N9_CLIENT_IDandN9_CLIENT_SECRETinkind: Deployment:N9_CLIENT_ID and N9_CLIENT_SECRET under kind: Deploymentspec:
containers:
# ...
env:
- name: N9_CLIENT_ID
valueFrom:
secretKeyRef:
key: client_id
name: nobl9-agent
- name: N9_CLIENT_SECRET
valueFrom:
secretKeyRef:
key: client_secret
name: nobl9-agent -
Add
volumesinkind: Deployment:volumes under kind: Deploymentspec:
containers:
env:
# ...
volumeMounts:
- name: volume-name
mountPath: /etc/n9/
volumes:
- name: volume-name
By default, the .env file mounted path is /etc/n9/secrets.env.
To set a different path, do the following:
- Specify the secrets in the
secrets.envfile. - Set the path to your
secrets.envin your agent configuration under theN9_SECRETS_PATHenvironment variable:
    apiVersion: v1
    kind: Deployment
    # ...
    spec:
      containers:
      # ...
        env:
          - name: N9_SECRETS_PATH
            value: /etc/n9/secrets.env
Deploying the agent in a Docker container
As a base image, the Nobl9 agent uses a distroless image: gcr.io/distroless/static-debian11.
Distroless images are minimal container images designed for security and efficiency, containing only the necessary components to run the application.
To deploy your Nobl9 agent using Docker, ensure Docker is running on your system and do the following:
- Copy the generated Docker command.
- Run the command in your terminal, replacing the placeholders with your actual values.
- Check the agent connection.
Sending custom HTTP headers to a data source
When deploying some Nobl9 agents1, you can set it up to send custom HTTP headers to your data source.
1Supported data sources
The following schema applies:
[
    {
        "key": "<header key>",
        "values": ["<value1>", "<value2>"]
    }
]
To inject custom headers when deploying your agent, do the following:
- Provide the required headers encoded as a Base64 string in a JSON file:
 data:
 # base64 encoded [{"key":"Authorization","values":["Bearer my-token"]}]
 custom-headers.json: base64_encoded_string
Replace the base64_encoded_string placeholder with your encoded string.
- Reference your Secret object in the
N9_CUSTOM_HTTP_HEADERenvironment variable:
 - name: N9_CUSTOM_HTTP_HEADERS
   valueFrom:
     secretKeyRef:
       name: your-nobl9-agent-name
       key: custom-headers.json
The encoded string is stored as data within a Kubernetes Secret object.
Custom HTTP headers support in data sources
| Data source | Minimum agent version |
|---|---|
| Amazon Prometheus | 0.88.0 / 0.83.0-beta |
| Azure Monitor managed service for Prometheus | 0.88.0 / 0.83.0-beta |
| Grafana Loki | 0.88.0 / 0.88.0-beta |
| Prometheus | 0.88.0 / 0.83.0-beta |
| Splunk | 0.90.0 / 0.89.1-beta |
Checking the agent connection on the Nobl9 Web
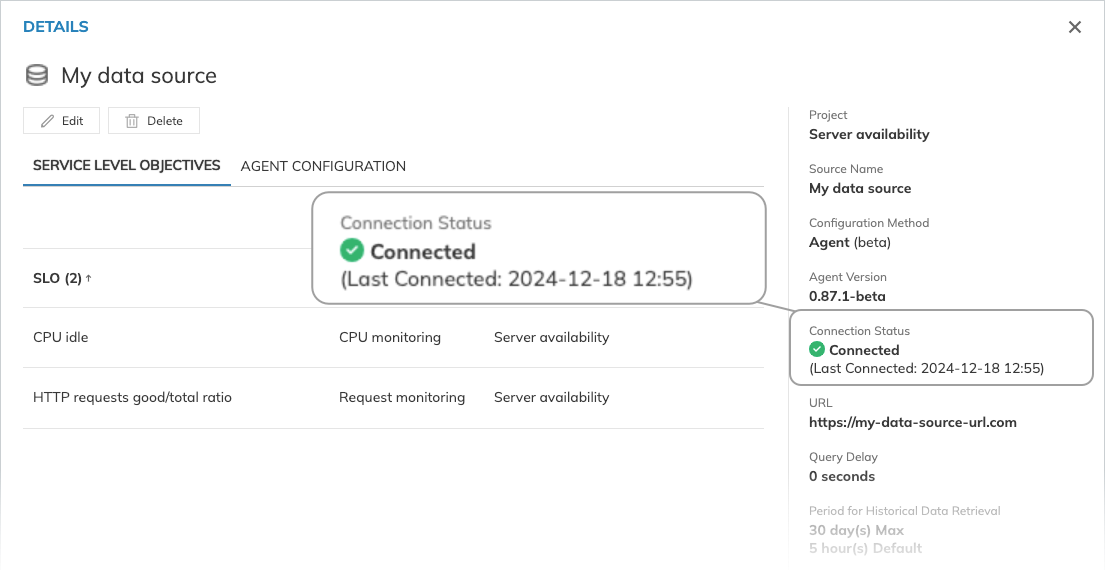
To verify if the agent is connected to Nobl9, check the timestamp under Connection Status in your data source details:

The connection status indicates your agent's connection to the Nobl9 backend only. It doesn't provide information about agent's connection to your data source.
For Prometheus-compatible data sources: to check the connection status, you can also scrape in from agent's
/health endpoint.
Learn more about Agent metrics.
Updating the Nobl9 agent
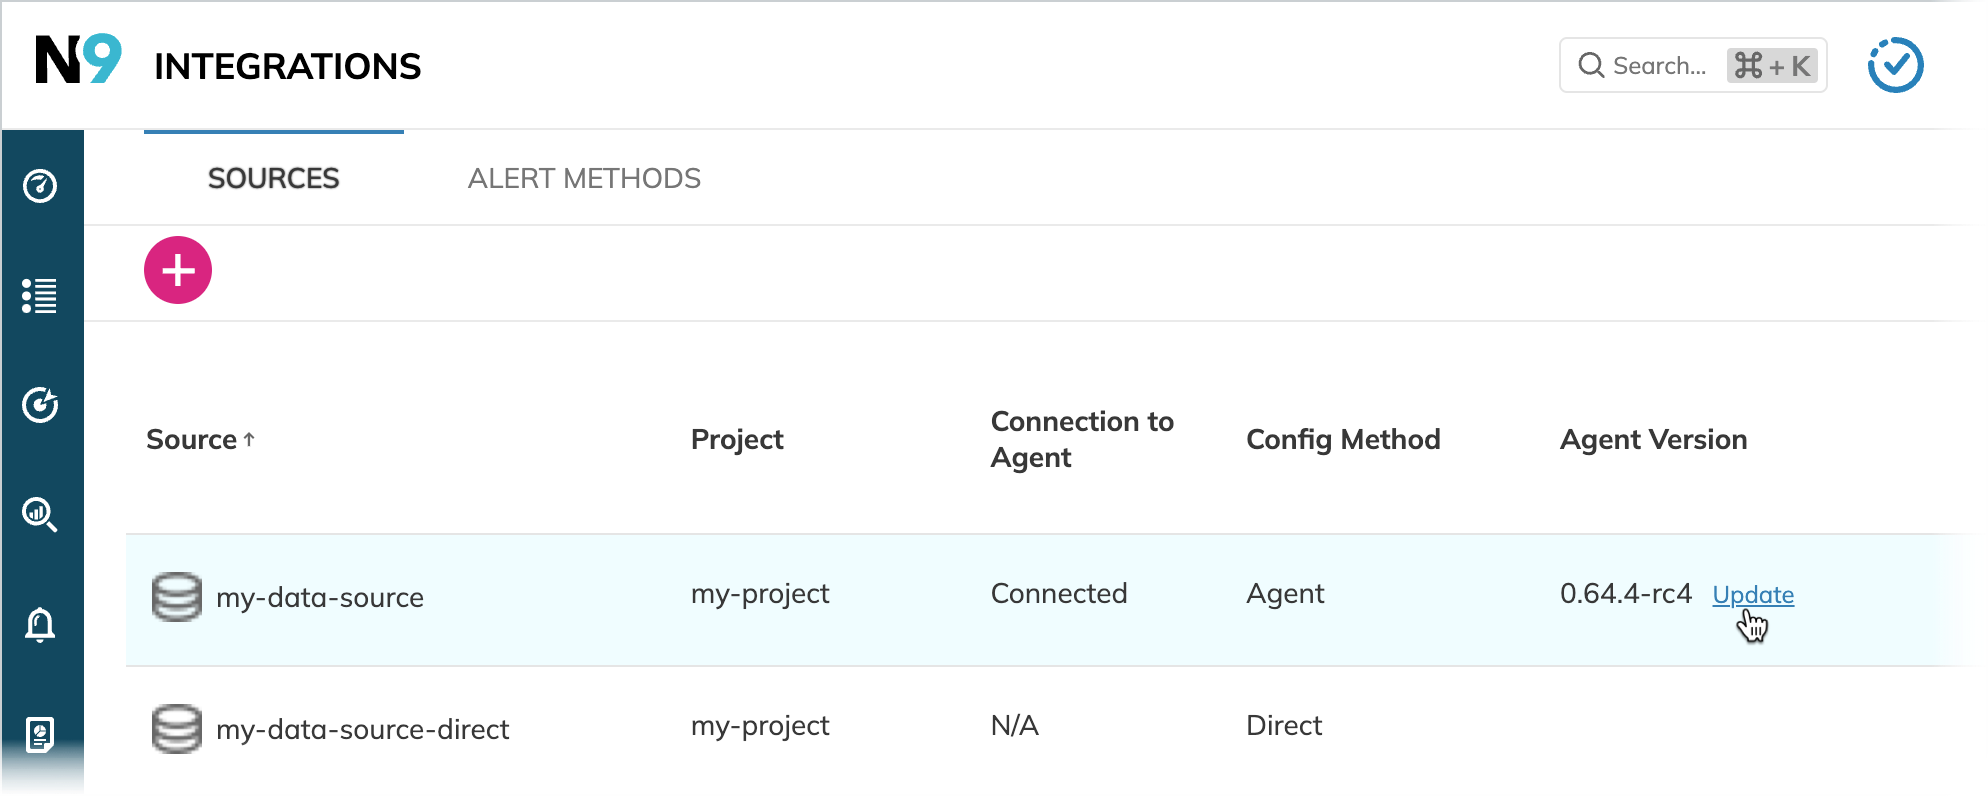
To update your Nobl9 agent, apply the new configuration file with the latest image of the agent in your Kubernetes cluster or Docker container.
Go to Integrations and click Update in the required agent row, next to the version:

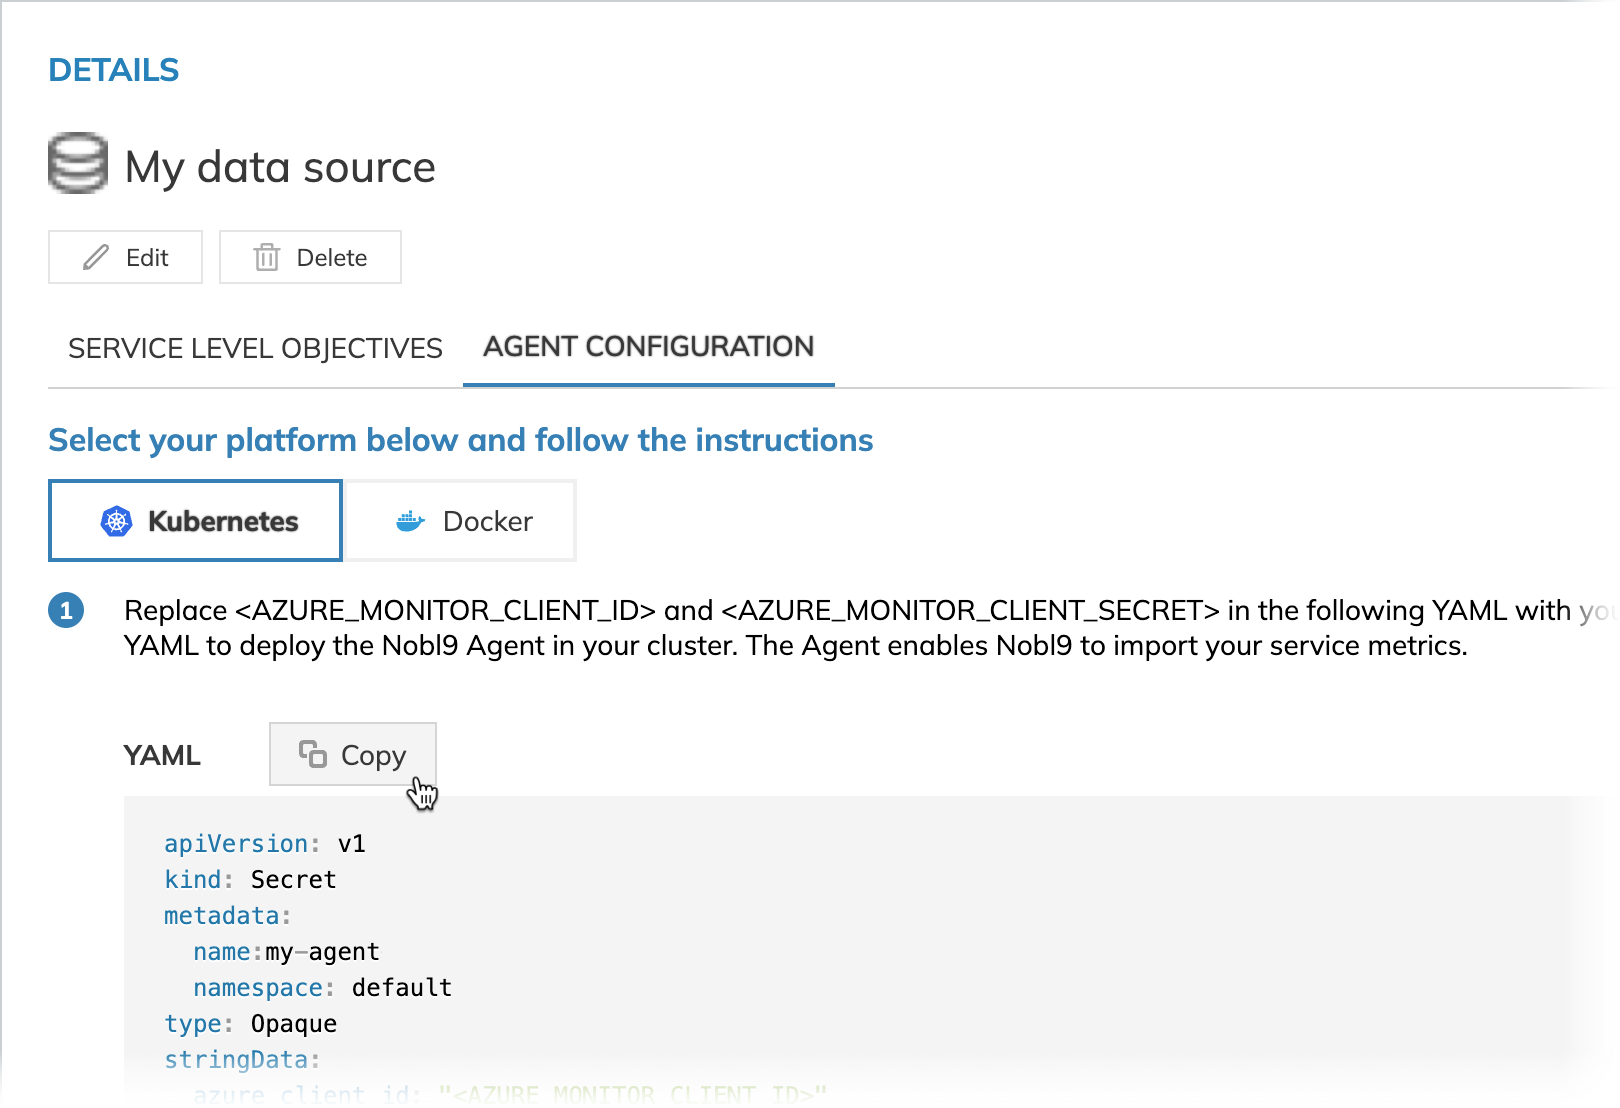
The new Docker and Kubernetes configuration will be applied for you immediately, copy-paste the generated file and apply it to your Kubernetes cluster or run it in your Docker container:

To pull the latest agent version from Docker Hub, run one of the following commands:
docker pull nobl9/agent:latestto update the agent stable version to the latestdocker pull nobl9/agent:latest-betato update the agent beta version
To set up automatic agent updates on restarting, use the latest agent version tags instead of the agent version in your Kubernetes or Docker configuration for agent deployment:
nobl9/agent:latestfor the agent stable versionnobl9/agent:latest-betafor the agent beta version
With them, the agent is updated automatically when restarting.
For example, a Kubernetes configuration:
apiVersion: apps/v1
kind: Deployment
spec:
  name: nobl9-agent
  containers:
    - name: agent-container
      image: nobl9/agent:latest
      # The rest of your agent deployment YAML
Exposing the agent to metrics
To expose the agent's internal metrics, modify its Kubernetes configuration or Docker command line as follows:
-
Deploy the agent: add the
N9_METRICS_PORTenvironment variable to specify the port required for metric exposure (for example,N9_METRICS_PORT=9876). This makes metrics available for scraping at/metrics. -
Deploy the agent behind a firewall: make any changes required to allow your metrics system to scrape that port.
-
The agent must be able to open connections to
https://app.nobl9.com/api/inputto send data to Nobl9.
Customizing query parameters
Nobl9 agent's querying behavior relies on four query parameters:
- Query interval
- Query delay
- Jitter
- Timeout
You can access your data source query parameters:
- From your data source details
- From your SLO details
- By running the
sloctl get [agents | directs]command
You can modify the query delay for your data source
using the Nobl9 Web App,
sloctl, or the Nobl9 Terraform provider.
All other parameter values are displayed for informational purposes only. To modify them, contact Nobl9 support.
When you apply changes to the query interval, jitter, or timeout through YAML definition of your agent or direct, it will have no effect on the actual data source configuration.
By default, Nobl9 retrieves data from the previous minute. Query parameter customization allows you to address specific cases. For example, if your data source cannot provide data from the previous minute, you can configure a longer query delay.
Increasing the query delay instructs your agent to fetch data older than one minute in the past.
For this, set the required value for your agent's QUERY_DELAY variable.
The following table specifies the list of the QUERY_DELAY environment variable names specific to each data source:
| Data source | Variable name |
|---|---|
| Amazon CloudWatch | CW_QUERY_DELAY |
| Amazon Redshift | REDSHIFT_QUERY_DELAY |
| AppDynamics | APPD_QUERY_DELAY |
| Azure Monitor beta | AZURE_MONITOR_QUERY_DELAY |
| Azure Monitor managed service for Prometheus beta | PROM_QUERY_DELAY |
| BigQuery | BIGQUERY_QUERY_DELAY |
| Datadog | DATADOG_QUERY_DELAY |
| Dynatrace | DYNATRACE_QUERY_DELAY |
| Elasticsearch | ES_QUERY_DELAY |
| Google Cloud Monitoring | GCM_QUERY_DELAY |
| Grafana loki | GRAFANA_LOKI_QUERY_DELAY |
| Graphite | GRAPHITE_QUERY_DELAY |
| InfluxDB | INFLUXDB_QUERY_DELAY |
| Instana | INSTANA_QUERY_DELAY |
| LogicMonitor beta | LOGIC_MONITOR_QUERY_DELAY |
| NewRelic | NR_QUERY_DELAY |
| OpenTSDB | OPENTSDB_QUERY_DELAY |
| Pingdom | PINGDOM_QUERY_DELAY |
| Prometheus | PROM_QUERY_DELAY |
| ServiceNow Cloud Observability | LS_QUERY_DELAY |
| Splunk | SPLUNK_QUERY_DELAY |
| Sumo Logic | SUMOLOGIC_QUERY_DELAY |
| Thousandeyes | THOUSANDEYES_QUERY_DELAY |
Set the query delay value in the Golang Duration format.
The following is an example of YAML configuration with the DYNATRACE_QUERY_DELAY variable:
apiVersion: apps/v1
kind: Deployment
metadata:
  name: nobl9-agent-dynatrace
spec:
  template:
    spec:
      containers:
        - name: agent-container
          image: nobl9/agent:0.107.2
          env:
            - name: DYNATRACE_QUERY_DELAY
              value: 60s
Useful links

 Helm chartsNobl9 agent
 Agent metricsNobl9 agent
 Agent timestamps cache persistenceNobl9 agent
 Query parametersNobl9 features
 Query delayNobl9 features
 Nobl9 agent beta version functionalityGetting started
 nobl9/agentdockerhub
 Nobl9 ProviderTerraform registry
 Data sources available in Nobl9Sources
 Nobl9 agent troubleshootingFAQ & troubleshooting
